Fitting a Door Threshold
Door thresholds can be fitted in a variety of ways depending on your particular situation but here are some ideas to get you thinking of the best way to approach the job. It is rarely an arduous task, but you may need some DIY experience.
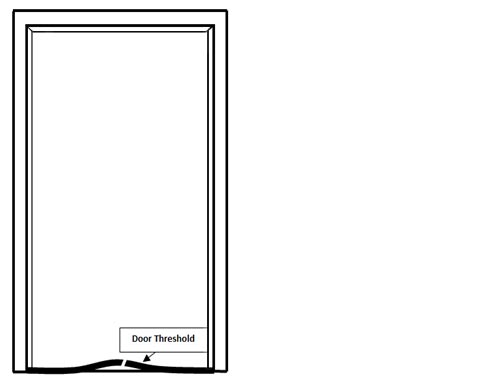
1) Removing the Old Threshold: If you are removing an old threshold, this can act as a great template for the new one and save some fitting time. It is therefore worth taking care by removing all fixing screws and cutting through any old silicone caulking with a utility knife. You should be able to lift up the old one and remove it, but if this proves difficult the threshold may have been glued down and cut into the door jambs on either side. If you just can’t move the threshold, you may find it necessary to prise up and cut through the centre with a hacksaw (preferably with the saw angled over about 15 degrees to the left or right) as illustrated below. This enables each side to be individually lifted up and pulled out of the door jamb. The angled cut in the centre makes it easier to lift up each side in turn as determined by the angle.
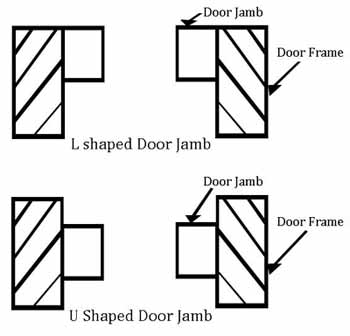
2) Preparing to cut the new threshold: Your new threshold will most likely be too long and need to be cut down to size. If the old one was easily removed, then you can use it as a template to prepare the new one. If not, you will need to measure the distance between the door frame. Divide the amount to be removed by 2 and take this off either end to preserve the screw spacing. A straight cut end butting up to the door frame on either side will be the simplest job, however, the door jamb shape may require that you have an L or U shaped cut out at each end to match. Sometimes it is possible to make a saw cut in the door jamb to create a straight fixing for the threshold against the door frame; this is a particularly useful method with a thin threshold, which can then be caulked in for a tidy job. Alternatively, if a cut out is required in the threshold, then this can often be done by measurement or making a cardboard template.
3) Cutting the Threshold: The method used to cut the threshold will to some extent depend on the material it is made of. Popular methods would include a hacksaw, a bandsaw, an angle grinder with a cutting wheel or a jigsaw. In all cases select a blade suitable for cutting the material being worked on. Aluminium and brass are relatively soft metals and will cut more easily than stainless steel which is hard to cut and not really suitable for cutting with a hack saw. Always protect the finish when using some of these tools. Paper masking tape is great for this and is easy to draw the cutting lines on. A file is useful to clean off any burrs after cutting and for any minor adjustments. A workbench clamping device will help to hold the threshold whilst cutting, taking care not to over-tighten.
4) Drilling the Threshold: Some thresholds are already pre-drilled and countersunk for fitting. Where they are not, and/or shortening has removed some of the pre-drilled holes, it may be necessary to drill and countersink fixing holes. Alternatively, if you are intending to glue the threshold in place, drilling will likely not be necessary. The drilling technique will depend on the material the threshold is made of. To avoid marking the threshold with drill skid, use plenty of masking tape to protect the area to be drilled and use split point drills. A small pilot hole may also help. Always use plenty of cutting oil when drilling metal to prevent the drill becoming blunt and burning the surface. Stainless steel will be harder to drill and cobalt drills will likely be required with plenty of cutting oil and using pilot holes. Countersink the holes so that the screw heads are flush with the surface using a countersink bit designed for metals. Use screws of adequate length to achieve a secure fixing and if possible made from the same material as the threshold to avoid electrolytic corrosion, especially in a damp area.
5) Fitting the Threshold: Three fitting methods can be considered, either screwing in place with countersunk screws and plugs where necessary, gluing in place with sealant, or a combination of the two. If there is a requirement for removing the plate from time to time, e.g. for intensive cleaning, then gluing is not so desirable and screw fixing would be best, although generally some sealant could be required at the external edges to protect from water ingress. Clean all loose dirt away before fixing so that any adhesive sealants have a sound surface to adhere to. It may be found that the area under the threshold is damp. There are “all weather” type silicone sealants available for this situation which can adhere to damp surfaces. When using sealants, good results can be achieved by using masking tape either side of the joint when applying. After smoothing down with a spatula wetted with soapy water, the masking tape should be removed soon after application and before the sealant starts to cure. Translucent sealants usually look best when fitting thresholds.
We hope this article helps to give you some ideas on how to approach a threshold replacement. In the vast majority of cases the job will be straight forward with rewarding results. Always ask a qualified tradesman to assist if you encounter problems or feel you are getting out of your depth.
