How to Fit Internal Door Handles Using a Door Handle Pack
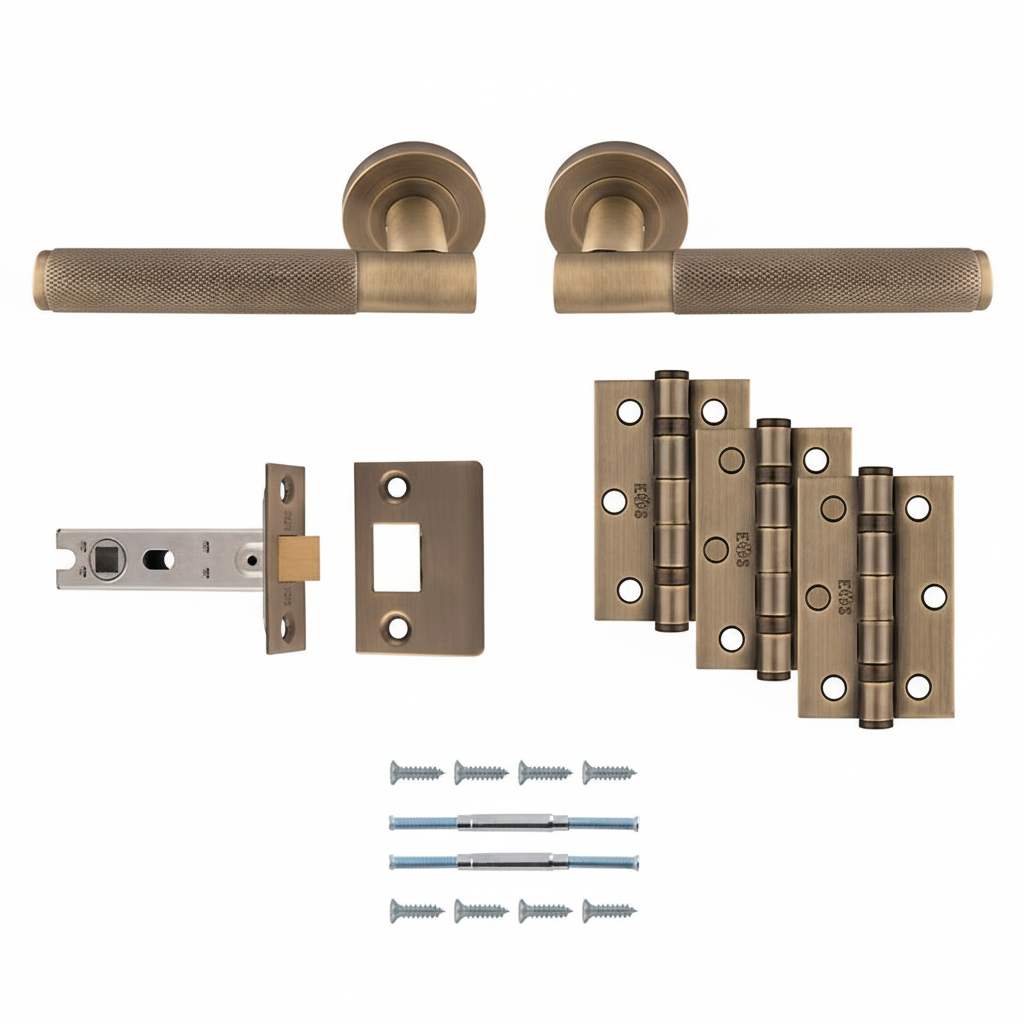
A door handle pack is one of the easiest ways to fit new internal door furniture because the essential parts are supplied together. Door Furniture Direct’s door handle packs are designed to simplify installation by including the handles, hinges, latch, strike plate, screws and through bolts in one set, with options in finishes such as antique darkened brass, matt black, polished chrome, satin nickel and satin stainless steel.
That matters because fitting internal door handles is much easier when the key components are already matched. Instead of checking whether the latch suits the handles or whether the fixings are compatible, you can focus on getting the installation neat, level and smooth in operation.
This guide takes you through the full process of fitting internal door handles using a pack, whether you are replacing existing hardware or fitting a new internal door from scratch.
What Comes in an Internal Door Handle Pack?
Door Furniture Direct describes its door handle packs as a complete fitting solution. Each pack includes the parts needed for installation: a pair of door handles, hinges, a latch, a strike plate, screws and through bolts. The category includes lever-on-rose styles from Carlisle Brass in a range of finishes for different interiors.
For fitting purposes, each part has a clear job:
-
The handles operate the latch.
-
The latch keeps the door closed.
-
The strike plate is fitted to the frame and receives the latch bolt.
-
The hinges support the door and allow it to swing smoothly.
-
The through bolts secure the handles firmly through the door.
-
The screws fix the latch, hinges and strike plate in place.
Using a pack helps create a consistent look and reduces the chance of mixing mismatched finishes or incompatible parts. Door Furniture Direct also positions these packs as a convenient way to achieve a coordinated finish across interior spaces.
Tools You Will Need
Before you start, gather the tools so the job runs smoothly:
-
Tape measure
-
Pencil
-
Combination square or straight edge
-
Screwdriver
-
Drill and wood drill bits
-
Spade bit or hole saw for the handle/latch holes if fitting from new
-
Chisel
-
Hammer
-
Utility knife
-
Spirit level
If you are replacing an existing set, you may not need every cutting tool, but it is still useful to have them ready in case the new latch or hinges require slight adjustments.
Before You Start: Check the Door and Handing
Before fitting anything, decide whether you are:
-
replacing old handles on an already hung door, or
-
fitting the full pack, including hinges and latch, to a new or stripped door.
Also check the handing of the door. Stand on the side where the door opens towards you. If the hinges are on the left, it is left hand hung. If the hinges are on the right, it is right hand hung. This helps when positioning the latch and checking that the handle sits comfortably once fitted.
If your door is already installed and swinging well, you can usually leave the hinges alone unless you are replacing them for finish or quality reasons. If the pack includes matching hinges and you want the full coordinated look, replacing them is worth doing carefully.
Step 1: Mark the Handle Height
The first job is deciding where the handles will sit.
For most internal doors, the handle is commonly fitted around 900mm to 1050mm from the floor, with many installers aiming around 1000mm as a comfortable average. If you are replacing old handles, the easiest approach is normally to reuse the existing height so the latch lines up with the previous mortice in the frame.
Use a tape measure to mark the height on the door edge, then transfer that line across both faces of the door with a square. This gives you a clear centre line for the latch and handle.
Accuracy here makes the rest of the installation much easier. If the line is out, the handles can end up uneven and the latch may not meet the strike plate cleanly.
Step 2: Fit or Replace the Hinges
If the door is already hung on good hinges and sitting correctly in the frame, you can move straight to the latch. If you are fitting the matching hinges from the pack, do that first.
Offer the hinges up to the door edge in the existing positions if you are replacing old ones. If it is a fresh door, mark out the hinge positions, usually one near the top and one near the bottom, with a third hinge added for heavier doors where required.
Score around each hinge leaf with a knife, then chisel out a recess deep enough for the hinge to sit flush. Screw the hinges to the door, then to the frame, and check that the door opens and closes cleanly.
Take your time here. Poorly fitted hinges can throw the whole door out of line, which then affects latch alignment and handle operation.
Step 3: Mark the Latch Position on the Door Edge
Now fit the latch.
Take the centre line you marked for the handle height and mark the exact centre of the door edge. Hold the tubular latch against the edge so the follower spindle hole lines up with your handle height. Mark around the faceplate and note the depth of the latch body.
It is important to check which way the latch bolt faces. The angled side of the latch should meet the strike plate as the door closes. If the latch is reversible, set it correctly before fitting.
A common mistake is installing the latch the wrong way around, which makes the door refuse to close properly.
Step 4: Drill the Latch Hole
Using a drill bit sized for the latch body, drill into the edge of the door to the correct depth. Keep the drill square to the door so the latch sits straight.
Once the main hole is drilled, drill through the face of the door from each side to create the spindle hole for the handles. Drilling halfway from one side and then finishing from the other helps avoid splintering the timber.
Test-fit the latch body. It should slide in snugly without force. If it is too tight, clean the hole carefully rather than hammering the latch into place.
Step 5: Chisel the Faceplate Recess
With the latch body sitting in the hole, draw around the latch faceplate on the door edge. Remove the latch and score the outline with a knife. Then chisel a shallow recess so the faceplate sits flush with the door edge.
This stage affects the final finish more than many people realise. A faceplate that sits proud looks untidy and can catch against the frame. One that is too deep can leave gaps around the edge.
Once the recess is right, screw the latch into place.
Step 6: Fit the Door Handles Using the Through Bolts
Now move on to the handles.
Most door handle packs in this category are lever-on-rose packs, and the inclusion of through bolts is a real advantage because they provide a firm, long-lasting fixing through the door rather than relying only on short wood screws.
Insert the spindle through the latch follower, then position one handle on each side of the door. Align them carefully so the roses sit level. Fit the through bolts according to the handle design and tighten them evenly.
Do not fully tighten one side before the other. Alternate gradually so both handles pull in square to the door.
Once secure, test the lever action. The latch bolt should retract smoothly and spring back cleanly when you release the handle.
If the handle feels stiff at this stage, check:
-
the latch is not twisted in the door,
-
the spindle is fully seated,
-
the through bolts are not overtightened and pulling the mechanism out of alignment.
Step 7: Mark the Strike Plate Position on the Frame
Close the door gently until the latch bolt touches the frame. Mark the top and bottom of the latch bolt on the frame. Then mark the centre line.
Hold the strike plate in place against these marks and trace around it. Also mark the position of the latch keep opening.
This step is worth doing slowly. A badly positioned strike plate is one of the main reasons a newly fitted handle feels awkward or the door rattles when shut.
Step 8: Cut the Recess for the Strike Plate
Chisel a shallow recess in the frame for the strike plate so it sits flush, just as you did for the latch faceplate on the door edge.
Then cut or drill the opening behind it for the latch bolt to enter fully. Screw the strike plate into place and test the door.
At this point, the door should close with a positive, clean action. The latch should engage without needing to lift, push or force the handle.
If the latch does not line up perfectly, adjust the keep opening or strike plate position slightly before tightening everything fully.
Step 9: Final Checks and Adjustments
Once all the parts are fitted, go back and test the full set several times.
Check that:
-
the hinges allow the door to swing freely,
-
the handle returns properly after use,
-
the latch retracts and springs back smoothly,
-
the strike plate receives the latch cleanly,
-
the roses sit level,
-
all screws are snug but not overtightened.
This final check is what separates a rushed installation from one that feels professional.
A well-fitted internal handle pack should give you a door that opens smoothly, closes neatly and looks consistent with the rest of the room.
Replacing Existing Internal Door Handles With a Pack
If you are replacing old internal handles rather than fitting from scratch, the process is usually quicker.
Remove the old handles, spindle and latch. Then compare the new latch dimensions against the old mortice in the door edge. If the new latch is the same size, the new pack may drop straight in. If not, you may need to widen the latch hole or adjust the faceplate recess slightly.
The same applies to the strike plate on the frame. If the new plate is a different size or shape, a little filling and re-cutting may be needed for the neatest finish.
This is one reason door handle packs are useful for full-room upgrades. The matched parts make it easier to achieve a consistent appearance even if small carpentry adjustments are needed during installation.
Common Mistakes to Avoid
A lot of fitting issues come down to a few avoidable mistakes.
One is drilling the spindle hole out of line with the latch. If the spindle does not run square through the latch, the handle can bind.
Another is fitting the latch bolt the wrong way around. On an internal door, the angled face should allow the door to close smoothly against the strike plate.
Overtightening is another common problem. Through bolts give a stronger fixing, but if they are pulled too tight they can distort the handle alignment and affect operation.
Poor strike plate positioning is also very common. Even a well-fitted handle can feel poor if the latch is not meeting the keep cleanly.
Finally, do not rush the mortices for the latch faceplate, strike plate or hinges. Flush fitting always looks better and performs better.
Why Door Handle Packs Make the Job Easier
Door Furniture Direct’s category page makes the value of these packs clear: they are intended to make finding and fitting new door handles easier by supplying a coordinated set of parts, without having to source each fitting separately. The range includes styles and finishes suited to homes, workplaces and other settings, with packs selected to balance durability, smooth performance and design.
From a fitting point of view, that saves time in three ways.
First, you know the finish will match across the handles, hinges and latch furniture.
Second, you avoid the hassle of ordering separate components and checking whether they work together.
Third, you get the through bolts and screws needed for installation in the same pack, which makes the job more straightforward from the moment you start.
Final Thoughts
Fitting internal door handles with a door handle pack is one of the simplest ways to upgrade an interior door properly. With the handles, latch, strike plate, hinges, screws and through bolts supplied together, you can concentrate on careful marking, accurate cutting and neat installation rather than worrying about whether the parts are compatible.
The key to a good result is to work in the right order: hang the door correctly, fit the latch accurately, secure the handles squarely with the through bolts, and position the strike plate so the door closes cleanly.
Done properly, the finished door will not just look better. It will feel better every time it is opened and closed.
